Windows
Mouse support in Hyper-V
This is how to add mouse support to the LICs (Linux Integration Components) provided by Microsoft. This does not involve using the Beta version of the LICs at all, it is all done with the production release version.
Firstly install everything else involved in getting the LICs working. There is another article in this blog that will explain how to get the LICs working with RedHat or CentOS 5.2.
On your Windows 2008 or Hyper-V server, download the “inputvsc.iso” from http://www.xen.org/download/satori.html.
Using the Hyper-V “Connect” window and its Media menu, set the DVD drive to point to the “inputvsc.iso” you just downloaded.
In the virtual machine, “mkdir /mnt” and “mount /dev/hdc /mnt”. That should mount the ISO on /mnt.
Make somewhere to put it, such as “mkdir -p /opt/inputdriver”.
Copy the contents of the ISO to there, “cp -pr /mnt/* /opt/inputdriver”.
Unmount the ISO, “umount /mnt”.
Eject the media using the Media menu in the Hyper-V “Connect” window.
Go into that directory, “cd /opt/inputdriver”.
Install one required package, “yum install xorg-x11-server-sdk”.
Install the mouse driver, “perl setup.pl inputdriver”.
That should succeed.
Start X Windows with “startx” to test it. If the mouse support doesn’t work, you can always kill X by pressing Ctrl-Alt-Backspace, or by logging in remotely to the virtual machine as root and typing “killall X”.
That’s about it. It worked fine for me!
Comments
Windows Vista Speed-Ups
16/09/08 20:41 Filed in: Windows Vista
This is a brief description of some of the things I have done to make Windows Vista usable on a laptop. It starts a lot of services that you don’t need, and enables lots of graphics features that you may not have hardware support for. So turn them off!
The main one to hit is Start / Administration Tools / Services. If you don’t have that, then right-click on the Start button as add Administration Tools to the Start menu.
The services that are enabled on my system are these. You may not have some of these due to software I have installed (mostly Apple stuff), and you may have a few extras due to extra software you have installed, which is probably mostly obvious.
You need these enabled:
All other services, I have disabled. This is actually quite a few, despite the length of the above list. All the ones listed above are Started after a normal boot.
Before changing the list of services you have enabled, I strongly advise creating a restore point (My Computer / Properties / somewhere).
I am using Superfetch as a bit of a test. This is the service that tries to guess which programs you will run depending on the day of the week. It will learn over time, so gradually improve performance. That’s the idea anyway. If you don’t like it, or run a totally random unpredictable set of programs when you boot each time, then disable the Superfetch service as well.
Using the setup above, I have got Windows Vista running at a vaguely usable speed. It’s still to start up applications, but that’s due to Microsoft dropping direct support for the graphics API that all Windows apps have always used. That was doomed to cause immense trouble for them, whatever anyone did. Virtually no normal apps use DirectX, and that’s all they support now. So every app in the book runs horribly slowly through an emulation layer. Fools.
But other than that, this gets Vista working just about as fast as you’ll get it going. Look up “Speed up Windows Vista” in Google too, that will give you some tricks I have also done and forgotten about here.
- Disable User Account Control. In Start / Control Panel / User Accounts / Turn User Account Control on or off, turn it off.
- Disable Transparency and a few of the nice graphics effects. This is all in Start / Control Panel / Personalize / Windows Color and Appearance.
- Also in Start / Control Panel / Personalize / Windows Color and Appearance / Open classic appearance... / Advanced... there you can change the size of the Active Title Bar to its minimum, and the Active Window Border to its minimum, and it will look less like it’s all been drawn with a 5-year old’s crayon.
The main one to hit is Start / Administration Tools / Services. If you don’t have that, then right-click on the Start button as add Administration Tools to the Start menu.
The services that are enabled on my system are these. You may not have some of these due to software I have installed (mostly Apple stuff), and you may have a few extras due to extra software you have installed, which is probably mostly obvious.
You need these enabled:
- Adobe Active File Monitor V6
- Apple Mobile Device
- Application Experience
- Background Intelligent Transfer Service
- Base Filtering Engine
- Bluetooth Support Service
- CNG Key Isolation
- COM_ Event System
- Computer Browser
- Cryptographic Services
- DCOM Server Process Launcher
- Desktop Window Manager Session Manager
- DHCP Client
- Diagnostic Policy Service
- Diagnostic System Host
- DNS Client
- Extensible Authentication Protocol
- F-PROT Antivirus for Windows system
- Group Policy Client
- GtFlashSwitch
- Human Interface Device Access
- IKE and AuthIP IPsec Keying Modules
- iPod Service
- IviRegMgr
- KtmRm for Distributed Transaction Coordinator
- Multimedia Class Scheduler
- Network Connections
- Network List Service
- Network Location Awareness
- Network Store Interface Service
- NSUService
- Personal Secure Drive Service
- PGPserv
- Plug and Play
- Print Spooler
- Program Compatibility Assistant Service
- ReadyBoost
- Remote Access Connection Manager
- Remote Procedure Call (RPM))
- Secondary Logon
- Secure Socket Tunneling Protocol Service
- Security Accounts Manager
- Security Center
- Security Platform Management Service
- Server
- Shell Hardware Detection
- Software Licensing
- SSDP Discovery
- Superfetch
- System Event Notification Service
- Task Scheduler
- TCP/IP NetBIOS Helper
- Telephony
- Themes
- TPM Base Services
- Trusted Playform Core Service
- User Profile Service
- VAIO Entertainment Database Service
- VAIO Entertainment File Import Service
- VAIO Entertainment TV Device Arbitration Service
- VAIO Entertainment UPnp Client Adapter
- VAIO Event Service
- Windows Audio
- Windows Audio Endpoint Builder
- Windows Driver Foundation - User-mode Driver Framework
- Windows Error Reporting Service
- Windows Event Log
- Windows Firewall
- Windows Management Instrumentation
- Windows Presentation Foundation Font Cache 3.0.0.0
- Windows Update
- WLAN AutoConfig
- Workstation
- XAudioService
All other services, I have disabled. This is actually quite a few, despite the length of the above list. All the ones listed above are Started after a normal boot.
Before changing the list of services you have enabled, I strongly advise creating a restore point (My Computer / Properties / somewhere).
I am using Superfetch as a bit of a test. This is the service that tries to guess which programs you will run depending on the day of the week. It will learn over time, so gradually improve performance. That’s the idea anyway. If you don’t like it, or run a totally random unpredictable set of programs when you boot each time, then disable the Superfetch service as well.
Using the setup above, I have got Windows Vista running at a vaguely usable speed. It’s still to start up applications, but that’s due to Microsoft dropping direct support for the graphics API that all Windows apps have always used. That was doomed to cause immense trouble for them, whatever anyone did. Virtually no normal apps use DirectX, and that’s all they support now. So every app in the book runs horribly slowly through an emulation layer. Fools.
But other than that, this gets Vista working just about as fast as you’ll get it going. Look up “Speed up Windows Vista” in Google too, that will give you some tricks I have also done and forgotten about here.
Hyper-V Linux Integration Components in x86_64 and x86 CentOS and RHEL
22/07/08 11:53 Filed in: Hyper-V | Windows Server 2008
Update: 16th February 2010: Added “unifdef” to the list of required RPMs to build the kernel.
Update: 10th September 2008: This page has been updated for the final release version of the Linux Integration Components.
Update: 19th September 2008: This page has been updated for CentOS and RedHat x86_64 and x86 releases, so all 4 variations are covered.
Update: 2nd December 2008: Link to Hyper-V Tools updated to 1.0 finally.
Update: 22nd May 2009: This does not work with CentOS 5.3 or RedHat 5.3.
This page tells you how to install the Windows Server 2008 virtualization Hyper-V Linux Integration Components in CentOS and RHEL (RedHat Enterprise Linux) 5. I initially did it all in x86_64 (or x64) as it is much more interesting and useful. There are also notes below about setting it up on 32-bit systems where there are differences.
Installing the ICs in CentOS 5.2 or RHEL 5.2 is rather harder than in SuSE 10.
By the time you reach the end of this guide, you will be able to use the RedHat or CentOS “setup” program and /etc/sysconfig/network-scripts/ifcfg-eth0 and ifcfg-seth0 files to set your seth0 interface as the primary interface to use in the virtual machine.
You need to copy the code off the CDROM ISO image, so let’s start by doing that. Using the “Media” menu in the Hyper-V “Connect...” window, choose “DVD Drive”, “Insert Disk...” and select the Linux Integration Components ISO image, usually called “LinuxIC.iso”. Then
mkdir -p /mnt/cdrom
mount /dev/cdrom /mnt/cdrom
cp -rp /mnt/cdrom /opt/linux_ic
umount /mnt/cdrom
I strongly advise at this point that you make sure you have the latest patches and updates on your system, so do “yum update“.
Next, get the kernel source for the exact version of kernel you are using. “rpm -q kernel” will tell you what kernel you have. Remember that a “yum update” may change the kernel version. For this example HOWTO, “rpm -q kernel” produced “kernel-2.6.18-92.el5” so my kernel source RPM will be “kernel-2.6.18-92.el5.src.rpm”.
Once you have the the kernel version, go and find the kernel source SRPM.
RedHat: You can get this from ftp://ftp.redhat.com/pub/redhat/linux/enterprise/5Server/en/os/SRPMS/kernel-2.6.18-92.el5.src.rpm.
CentOS: You can get this from ftp://mirrorservice.org/sites/mirror.centos.org/5.2/updates/SRPMS/kernel-2.6.18-92.1.10.el5.src.rpm.
You will obviously have to get networking working using the legacy network adapter so that you can reach ftp.redhat.com to fetch this file.
yum install redhat-rpm-config gcc rpm-build make gnupg unifdef
If you are not sure, run that command anyway, it will not do any harm if you already have the packages installed.
Install the SRPM with the command
rpm -ivh kernel-*.src.rpm
which will get you the full kernel source in /usr/src/redhat/SOURCES (along with all RedHat’s patches) and the spec file in /usr/src/redhat/SPECS/kernel-2.6.spec. You need to edit the spec file, so make a backup copy of it first for safety.
Before the “%build” line, insert this line:
64-bit systems: patch -p1 -d ../linux-%{kversion}.%{_target_cpu} < /opt/linux_ic/patch/x2v-x64-rhel.patch
32-bit systems: patch -p1 -d ../linux-%{kversion}.%{_target_cpu} < /opt/linux_ic/patch/x2v-x32-rhel.patch
You also want to only build the “xen” version of the kernel. So find the line that defined “%define with_xen” and change it to
%define with_xen 1
and the line containing “%define with_xenonly”, if there is one, needs to be changed to
%define with_xenonly 1
You can now build the RPM, which will construct the xen one which is what you need. So
cd /usr/src/redhat/SPECS
64-bit systems: rpmbuild -ba kernel-2.6.spec
32-bit systems: rpmbuild -ba --target i686 kernel-2.6.spec
Be warned, this will take *hours* on a on a virtual machine.
If, shortly after that starts, you get an error about “Not enough random bytes available” then do this to make some more entropy:
1. Press Ctrl-Z
2. Run the command “du / ; grep -r hello /“
3. Let this run for 30 seconds or so, then press Ctrl-C
4. Run the command “fg”
5. If nothing happens immediately, go back to step 1, just above, and try again.
32-bit systems: cd /usr/src/redhat/RPMS/i686
rpm -ivh kernel-xen-2*rpm
rpm -Uvh kernel-xen-devel-2*rpm
If either of those “rpm” commands give any errors, add “--force” to the command and run it again.
Build the x2v version of the kernel
cd /opt/linux_ic
perl setup.pl x2v /boot/grub/grub.conf
Check the /boot/grub/grub.conf file, especially the “kernel” line, but no changes should be needed on simple RedHat 64-bit single-operating-system setups.
64-bit systems: The first section of the file should look like this:
title Red Hat Enterprise Linux Server (2.6.18-92.el5xen)
root (hd0,0)
kernel /x2v-64.gz
module /vmlinuz-2.6.18-92.el5xen ro root=/dev/VolGroup00/LogVol00 rhgb quiet
module /initrd-2.6.18-92.el5xen.img
32-bit systems: The first section of the file should look like this:
title Red Hat Enterprise Linux Server (2.6.18-92.el5xen)
root (hd0,0)
kernel /x2v-pae.gz
module /vmlinuz-2.6.18-92.el5xen ro root=/dev/VolGroup00/LogVol00 rhgb quiet
module /initrd-2.6.18-92.el5xen.img
Now double-check the “kernel” line, and make sure it says “pae” and not “32”.
Reboot, and it should boot your newly built kernel with the X2V shims in place.
To fix the “build” link, make it point into the kernel source that you have been building from, with something like this:
cd /lib/modules/`uname -r`
ln -nsf /usr/src/kernels/`uname -r`-`arch` build
Note: Please note that in the preceding commands, the quotes are single backquotes, not apostrophes or anything else.
RedHat systems:
cd /opt/linux_ic
perl setup.pl drivers
CentOS systems:
cd /opt/linux_ic
Edit setup.pl and look for the string “kernel-devel”. Change that to “kernel-xen-devel” and save the file.
perl setup.pl drivers
You should now have the drivers running. If you have added a network adapter (not a “Legacy Network Adapter&rdquo to your virtual machine, you should find that “ifconfig -a” outputs a new network device “seth0”. When you reboot, the vmbus module willl automatically be started, along with the other synthetic device drivers, such as the SCSI storage driver and the network driver.
Update: 10 Sept 2008: This step does not appear to be required
To build a new initrd image, so that all the correct drivers are detected every time your virtual machine boots, you need to do this (note this is one very long command, all on one line):
mkinitrd -f --preload vmbus --preload storvsc --preload netvsc --preload blkvsc --force-ide-probe --force-scsi-probe --force-lvm-probe /boot/initrd-2.6.18-92.el5xen.img 2.6.18-92.el5xen
Update: 10 Sept 2008: This section does not appear to be required
yum install xorg-x11-server-sdk xorg-x11-proto-devel
Note that for that “yum” command to work with RedHat Linux, you must be subscribed to their update service so that you can fetch the package, or else you will have to go and find them on your installation DVD/CDs.
Then
cd /opt/linux_ic
cd drivers/dist
make inputvsc_install
At this point, you might want to reboot to be sure that your new network devices are configured how you expected at boot time, and that any SCSI disks specified in /etc/fstab are mounted as you expected.
You now have the same ICs running in CentOS 5.2 or RHEL 5.2 as Microsoft intended to run in SuSE Linux.
Update: 10th September 2008: This page has been updated for the final release version of the Linux Integration Components.
Update: 19th September 2008: This page has been updated for CentOS and RedHat x86_64 and x86 releases, so all 4 variations are covered.
Update: 2nd December 2008: Link to Hyper-V Tools updated to 1.0 finally.
Update: 22nd May 2009: This does not work with CentOS 5.3 or RedHat 5.3.
This page tells you how to install the Windows Server 2008 virtualization Hyper-V Linux Integration Components in CentOS and RHEL (RedHat Enterprise Linux) 5. I initially did it all in x86_64 (or x64) as it is much more interesting and useful. There are also notes below about setting it up on 32-bit systems where there are differences.
Installing the ICs in CentOS 5.2 or RHEL 5.2 is rather harder than in SuSE 10.
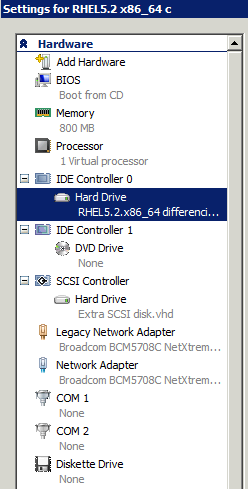
Configuring the Virtual Machine
Using the Hyper-V Manager, edit the settings of your new RHEL or CentOS virtual machine, and add a Network Adapter (in addition to the Legacy Network Adapter you already have) and a SCSI Controller with a Hard Drive attached to it. Ensure the Network Adapter is assigned to the virtual network that contains your physical external network card. The hardware settings window should look similar to this:By the time you reach the end of this guide, you will be able to use the RedHat or CentOS “setup” program and /etc/sysconfig/network-scripts/ifcfg-eth0 and ifcfg-seth0 files to set your seth0 interface as the primary interface to use in the virtual machine.
Fetching the Tools
You first need to fetch a copy of the ISO image from the zip of the Linux Integration Components.You need to copy the code off the CDROM ISO image, so let’s start by doing that. Using the “Media” menu in the Hyper-V “Connect...” window, choose “DVD Drive”, “Insert Disk...” and select the Linux Integration Components ISO image, usually called “LinuxIC.iso”. Then
mkdir -p /mnt/cdrom
mount /dev/cdrom /mnt/cdrom
cp -rp /mnt/cdrom /opt/linux_ic
umount /mnt/cdrom
I strongly advise at this point that you make sure you have the latest patches and updates on your system, so do “yum update“.
Next, get the kernel source for the exact version of kernel you are using. “rpm -q kernel” will tell you what kernel you have. Remember that a “yum update” may change the kernel version. For this example HOWTO, “rpm -q kernel” produced “kernel-2.6.18-92.el5” so my kernel source RPM will be “kernel-2.6.18-92.el5.src.rpm”.
Once you have the the kernel version, go and find the kernel source SRPM.
RedHat: You can get this from ftp://ftp.redhat.com/pub/redhat/linux/enterprise/5Server/en/os/SRPMS/kernel-2.6.18-92.el5.src.rpm.
CentOS: You can get this from ftp://mirrorservice.org/sites/mirror.centos.org/5.2/updates/SRPMS/kernel-2.6.18-92.1.10.el5.src.rpm.
You will obviously have to get networking working using the legacy network adapter so that you can reach ftp.redhat.com to fetch this file.
Building the Kernel
In order to install and build the kernel, there are a few packages you need to ensure you have installed. If you installed everything, then don’t worry. If you didn’t, then you will find you will need to do this, which should install all the packages you actually need:yum install redhat-rpm-config gcc rpm-build make gnupg unifdef
If you are not sure, run that command anyway, it will not do any harm if you already have the packages installed.
Install the SRPM with the command
rpm -ivh kernel-*.src.rpm
which will get you the full kernel source in /usr/src/redhat/SOURCES (along with all RedHat’s patches) and the spec file in /usr/src/redhat/SPECS/kernel-2.6.spec. You need to edit the spec file, so make a backup copy of it first for safety.
Before the “%build” line, insert this line:
64-bit systems: patch -p1 -d ../linux-%{kversion}.%{_target_cpu} < /opt/linux_ic/patch/x2v-x64-rhel.patch
32-bit systems: patch -p1 -d ../linux-%{kversion}.%{_target_cpu} < /opt/linux_ic/patch/x2v-x32-rhel.patch
You also want to only build the “xen” version of the kernel. So find the line that defined “%define with_xen” and change it to
%define with_xen 1
and the line containing “%define with_xenonly”, if there is one, needs to be changed to
%define with_xenonly 1
You can now build the RPM, which will construct the xen one which is what you need. So
cd /usr/src/redhat/SPECS
64-bit systems: rpmbuild -ba kernel-2.6.spec
32-bit systems: rpmbuild -ba --target i686 kernel-2.6.spec
Be warned, this will take *hours* on a on a virtual machine.
If, shortly after that starts, you get an error about “Not enough random bytes available” then do this to make some more entropy:
1. Press Ctrl-Z
2. Run the command “du / ; grep -r hello /“
3. Let this run for 30 seconds or so, then press Ctrl-C
4. Run the command “fg”
5. If nothing happens immediately, go back to step 1, just above, and try again.
Installing the Kernel
64-bit systems: cd /usr/src/redhat/RPMS/x86_6432-bit systems: cd /usr/src/redhat/RPMS/i686
rpm -ivh kernel-xen-2*rpm
rpm -Uvh kernel-xen-devel-2*rpm
If either of those “rpm” commands give any errors, add “--force” to the command and run it again.
Build the x2v version of the kernel
cd /opt/linux_ic
perl setup.pl x2v /boot/grub/grub.conf
Check the /boot/grub/grub.conf file, especially the “kernel” line, but no changes should be needed on simple RedHat 64-bit single-operating-system setups.
64-bit systems: The first section of the file should look like this:
title Red Hat Enterprise Linux Server (2.6.18-92.el5xen)
root (hd0,0)
kernel /x2v-64.gz
module /vmlinuz-2.6.18-92.el5xen ro root=/dev/VolGroup00/LogVol00 rhgb quiet
module /initrd-2.6.18-92.el5xen.img
32-bit systems: The first section of the file should look like this:
title Red Hat Enterprise Linux Server (2.6.18-92.el5xen)
root (hd0,0)
kernel /x2v-pae.gz
module /vmlinuz-2.6.18-92.el5xen ro root=/dev/VolGroup00/LogVol00 rhgb quiet
module /initrd-2.6.18-92.el5xen.img
Now double-check the “kernel” line, and make sure it says “pae” and not “32”.
Reboot, and it should boot your newly built kernel with the X2V shims in place.
Building the Hypervisor, Network and Storage Drivers
The next step is to build the drivers. There are a problem that needs fixing first, the “build” link in the /lib/modules/ directory will be broken, and you need a module build environment.To fix the “build” link, make it point into the kernel source that you have been building from, with something like this:
cd /lib/modules/`uname -r`
ln -nsf /usr/src/kernels/`uname -r`-`arch` build
Note: Please note that in the preceding commands, the quotes are single backquotes, not apostrophes or anything else.
Build the Drivers
RedHat systems:
cd /opt/linux_ic
perl setup.pl drivers
CentOS systems:
cd /opt/linux_ic
Edit setup.pl and look for the string “kernel-devel”. Change that to “kernel-xen-devel” and save the file.
perl setup.pl drivers
You should now have the drivers running. If you have added a network adapter (not a “Legacy Network Adapter&rdquo
Update: 10 Sept 2008: This step does not appear to be required
To build a new initrd image, so that all the correct drivers are detected every time your virtual machine boots, you need to do this (note this is one very long command, all on one line):
mkinitrd -f --preload vmbus --preload storvsc --preload netvsc --preload blkvsc --force-ide-probe --force-scsi-probe --force-lvm-probe /boot/initrd-2.6.18-92.el5xen.img 2.6.18-92.el5xen
Update: 10 Sept 2008: This section does not appear to be required
Building the X Mouse Driver
The last step is to build the mouse driver for use by X. This is very simple, you just need to install a couple of extra packages withyum install xorg-x11-server-sdk xorg-x11-proto-devel
Note that for that “yum” command to work with RedHat Linux, you must be subscribed to their update service so that you can fetch the package, or else you will have to go and find them on your installation DVD/CDs.
Then
cd /opt/linux_ic
cd drivers/dist
make inputvsc_install
That’s it!
You can now use the “setup” command to configure the networking and then edit the /etc/sysconfig/network-scripts/ifcfg-*eth* files to configure the new “seth0” interface to start on boot, and configure the old legacy “eth0” interface to not start on boot (set “ONBOOT=no” in /etc/sysconfig/network-scripts/ifcfg-eth0).At this point, you might want to reboot to be sure that your new network devices are configured how you expected at boot time, and that any SCSI disks specified in /etc/fstab are mounted as you expected.
You now have the same ICs running in CentOS 5.2 or RHEL 5.2 as Microsoft intended to run in SuSE Linux.
Windows 2008 Hyper-V and Solaris 10
04/04/08 12:20 Filed in: Hyper-V
Update 8 April 2008 --- Microsoft broke the legacy network adapter in Hyper-V RC. Apparently Sun and Microsoft are working together to make Solaris work as a guest operating system, so hopefully this will be fixed in a future update.
This documents my experiments with OpenSolaris 10 (Solaris Express), Jan 2008 edition, getting it to run under Hyper-V (release candidate) on Windows Server 2008 (public product release).
The current (2008 Q1) release of Solaris 10 does not work on the release candidate of Hyper-V due to bugs in the Hyper-V BIOS (according to Sun). The 2008 Q2 release, which is otherwise known as Solaris 10 Update 5, will apparently work with Hyper-V, according to Sun. So at the moment I am limited to OpenSolaris 10 (January 2008 release) which is why I chose it and not the official Sun Solaris 10 product.
Creating The Virtual Machine
When creating the virtual machine,
don’t skimp the RAM allocated. It requires a minimum of about 900Mb and it will install significantly quicker with more than that, as otherwise it will swap, which is very slow. I gave it 1300 Mbytes and it did not appear to swap.
In the BIOS settings, set it to boot off IDE then CD, which will prevent it repeating the installation should you forget to eject the DVD image at the end of the installation process.
Remove the network adapter and add a ‘Legacy Network Adapter’ connected to your virtual network in Hyper-V that connects to the external physical network adapter.
Fetching the ISO
You can download the ISO image of OpenSolaris from http://www.opensolaris.org/os/project/indiana/resources/getit/, which will link through to www.sun.com to do the actual download. You will need to register on www.sun.com if you haven’t already done so.
Installation Choices
When you start it up, it will present a text menu of different installation choices. For the easiest and most reliable way to install, choose option 4 (interactive console session). Do not press Return!
Your network adapter should appear as device dnet0. When partitioning the hard disk, I would advise editing the default layout. Remove the /export/home slice altogether, and increase the size of the / slice to fill all available space left on the disk. By default, Solaris always gives you a tiny / partition, which causes endless trouble later when lots of space is needed to install patches and their back-out information. You really do want a / as big as possible.
Set it to manually eject the CD/DVD and manually reboot.
Install all the software. The OEM support is not necessary, but install everything else. The total installation should take around 2½ to 3 hours including all the time taken for you to setup the networking and disk layout, before the software installation process begins.
Note from Russ Blaine at Sun:
Just beware of one thing: Solaris doesn't work in 64-bit mode due to
Hyper-V bug #336932. After you install OpenSolaris, configure it to
boot 32-bit by removing $ISADIR from all paths in the grub entry.
Unfortunately I have set it to auto-reboot at the end of the installation process, so I’m going to have to try to boot single-user to change this, or modify the boot command-line at boot time to remove whatever $ISADIR might look like in reality, then edit it in multi-user mode if it gets that far.
Only Works in 32-bit Mode, not 64-bit Mode
So when it reboots, I choose “Failsafe” from the boot menu, and get into single-user mode. The new system it just built is available in /a, so I
At the end of the installation, before it reboots
TERM=vt100
export TERM
and then edit the /a/boot/grub/menu.lst file in the new installed system. Remove all mention is “$ISADIR/” from the boot entries in this file. If you don’t, it will crash as soon as it tries to boot. OpenSolaris only works in 32-bit mode, and the $ISADIR stuff will boot it in 64-bit mode.
Once you’ve fixed this, “reboot” and let it boot the default choice in the boot menu. Booting the first time will take several minutes.
Disabling Graphical Login Prompt
If you find it boots into graphical mode, and you are using it remotely via a Remote Desktop connection, you’re a bit screwed at this point as you have no mouse to do anything with. Let the machine settle, then reset it. Choose the “Failsafe” boot option which will eventually take you to a single-user prompt. You can’t edit the services database now, but you can edit the script that actually tries to start up the graphical login So edit /a/lib/svc/method/svc-kdmconfig and change the file to do “exit $SMF_EXIT_OK” just before it sets the “TERM” variable. Then reboot and boot normally.
Once you have rebooted and logged in as root, you can stop it trying to do the graphical login at all:
svcadm disable /application/graphical-login/gdm
svcadm disable /application/graphical-login/cde-login
Verbose Reconfiguraion Boot
A verbose reconfiguration boot can be triggered by:
reboot -- -rv -m verbose
This works on Intel hardware by adding a temporary menu entry to the GRUB configuration. This extra entry will of course have the “$ISADIR/” strings in it, and so will fail to boot. So as soon as the GRUB menu appears on the screen, choose the “Failsafe” boot option. Say “y” when it asks you about mounting the real Solaris installation on “/a”. Once it has booted single-user,
TERM=vt100
export TERM
cd /a/boot/grub
vi menu.lst
and remove the strings “$ISADIR/” from the new section it added to the bottom of the list. Save and exit, then “reboot”. Then it will successfully boot in a very verbose mode, showing you exactly what it is starting and when. It will remove the extra GRUB menu entry automatically.
Outstanding Problems
I have still not managed to get any life out of the virtual legacy network adapter. Solaris is seeing and configuring the device, but not actually getting any packets in or out of it.
This documents my experiments with OpenSolaris 10 (Solaris Express), Jan 2008 edition, getting it to run under Hyper-V (release candidate) on Windows Server 2008 (public product release).
The current (2008 Q1) release of Solaris 10 does not work on the release candidate of Hyper-V due to bugs in the Hyper-V BIOS (according to Sun). The 2008 Q2 release, which is otherwise known as Solaris 10 Update 5, will apparently work with Hyper-V, according to Sun. So at the moment I am limited to OpenSolaris 10 (January 2008 release) which is why I chose it and not the official Sun Solaris 10 product.
Creating The Virtual Machine
When creating the virtual machine,
don’t skimp the RAM allocated. It requires a minimum of about 900Mb and it will install significantly quicker with more than that, as otherwise it will swap, which is very slow. I gave it 1300 Mbytes and it did not appear to swap.
In the BIOS settings, set it to boot off IDE then CD, which will prevent it repeating the installation should you forget to eject the DVD image at the end of the installation process.
Remove the network adapter and add a ‘Legacy Network Adapter’ connected to your virtual network in Hyper-V that connects to the external physical network adapter.
Fetching the ISO
You can download the ISO image of OpenSolaris from http://www.opensolaris.org/os/project/indiana/resources/getit/, which will link through to www.sun.com to do the actual download. You will need to register on www.sun.com if you haven’t already done so.
Installation Choices
When you start it up, it will present a text menu of different installation choices. For the easiest and most reliable way to install, choose option 4 (interactive console session). Do not press Return!
Your network adapter should appear as device dnet0. When partitioning the hard disk, I would advise editing the default layout. Remove the /export/home slice altogether, and increase the size of the / slice to fill all available space left on the disk. By default, Solaris always gives you a tiny / partition, which causes endless trouble later when lots of space is needed to install patches and their back-out information. You really do want a / as big as possible.
Set it to manually eject the CD/DVD and manually reboot.
Install all the software. The OEM support is not necessary, but install everything else. The total installation should take around 2½ to 3 hours including all the time taken for you to setup the networking and disk layout, before the software installation process begins.
Note from Russ Blaine at Sun:
Just beware of one thing: Solaris doesn't work in 64-bit mode due to
Hyper-V bug #336932. After you install OpenSolaris, configure it to
boot 32-bit by removing $ISADIR from all paths in the grub entry.
Unfortunately I have set it to auto-reboot at the end of the installation process, so I’m going to have to try to boot single-user to change this, or modify the boot command-line at boot time to remove whatever $ISADIR might look like in reality, then edit it in multi-user mode if it gets that far.
Only Works in 32-bit Mode, not 64-bit Mode
So when it reboots, I choose “Failsafe” from the boot menu, and get into single-user mode. The new system it just built is available in /a, so I
At the end of the installation, before it reboots
TERM=vt100
export TERM
and then edit the /a/boot/grub/menu.lst file in the new installed system. Remove all mention is “$ISADIR/” from the boot entries in this file. If you don’t, it will crash as soon as it tries to boot. OpenSolaris only works in 32-bit mode, and the $ISADIR stuff will boot it in 64-bit mode.
Once you’ve fixed this, “reboot” and let it boot the default choice in the boot menu. Booting the first time will take several minutes.
Disabling Graphical Login Prompt
If you find it boots into graphical mode, and you are using it remotely via a Remote Desktop connection, you’re a bit screwed at this point as you have no mouse to do anything with. Let the machine settle, then reset it. Choose the “Failsafe” boot option which will eventually take you to a single-user prompt. You can’t edit the services database now, but you can edit the script that actually tries to start up the graphical login
Once you have rebooted and logged in as root, you can stop it trying to do the graphical login at all:
svcadm disable /application/graphical-login/gdm
svcadm disable /application/graphical-login/cde-login
Verbose Reconfiguraion Boot
A verbose reconfiguration boot can be triggered by:
reboot -- -rv -m verbose
This works on Intel hardware by adding a temporary menu entry to the GRUB configuration. This extra entry will of course have the “$ISADIR/” strings in it, and so will fail to boot. So as soon as the GRUB menu appears on the screen, choose the “Failsafe” boot option. Say “y” when it asks you about mounting the real Solaris installation on “/a”. Once it has booted single-user,
TERM=vt100
export TERM
cd /a/boot/grub
vi menu.lst
and remove the strings “$ISADIR/” from the new section it added to the bottom of the list. Save and exit, then “reboot”. Then it will successfully boot in a very verbose mode, showing you exactly what it is starting and when. It will remove the extra GRUB menu entry automatically.
Outstanding Problems
I have still not managed to get any life out of the virtual legacy network adapter. Solaris is seeing and configuring the device, but not actually getting any packets in or out of it.
Hyper-V beta Linux Integration Components
31/03/08 12:19 Filed in: Hyper-V
Update 31st March 2008: Microsoft have released the RC version of the Linux Integration Components and they are available at https://connect.microsoft.com/Downloads/Downloads.aspx?SiteID=495.
Currently, Microsoft have not made any version of the Linux Integration Components available for Windows Server 2008 Hyper-V virtualisation.
So, as a temporary solution until they get the new version out, I have made a copy available at http://www.jules.fm/hyperv_linux.zip
I don’t think Microsoft can complain much about me doing this, it’s just a temporary solution for the few people who need it now and cannot wait until the new version is released.
Activating Windows Server 2008
11/03/08 12:19 Filed in: Windows Server 2008
Microsoft Windows [Version 6.0.6001]
Copyright (c) 2006 Microsoft Corporation. All rights reserved.
C:\Users\Administrator>cscript \windows\system32\slmgr.vbs /ipk VPWVT-.....-.....-.....-.....
Microsoft (R) Windows Script Host Version 5.7
Copyright (C) Microsoft Corporation. All rights reserved.
Installed product key VPWVT-....-.....-.....-..... successfully.
C:\Users\Administrator>cscript \windows\system32\slmgr.vbs /ato
Microsoft (R) Windows Script Host Version 5.7
Copyright (C) Microsoft Corporation. All rights reserved.
Activating Windows Server(R), ServerEnterprise edition (bb1d27c4-959d-4f82-b0fd-c02a7be54732) ...
Product activated successfully.
C:\Users\Administrator>
As easy as that
Hyper-V Integration Components in x86_64 CentOS and RHEL
02/01/08 12:12 Filed in: Hyper-V
Update 13th July 2008: New version of this HOWTO is available with information on Linux Integration Components RC2.
This page tells you how to install the Windows Server 2008 virtualization Hyper-V Linux Integration Components in CentOS and RHEL (RedHat Enterprise Linux) 5. I did it all in x86_64 (or x64) as it is much more interesting and useful.
Installing the ICs in CentOS 5.1 or RHEL 5.1 is rather harder than in SuSE 10.
You need to copy the code off the CDROM ISO image, so let’s start by doing that:
mkdir -p /mnt/cdrom
mount /dev/cdrom /mnt/cdrom
mkdir /opt/linux_ic
( cd /mnt/cdrom && tar cf - . ) | ( cd /opt/linux_ic && tar xvBpf - )
umount /mnt/cdrom
Next, get the kernel source for the exact version of kernel and kernel-headers you are using. “rpm -qa | grep kernel” will tell you what kernel-headers you have. Remember that a “yum update” may change the kernel version.
Once you have the the kernel version, go and find the kernel source SRPM. You can get this from http://mirrors.centos.org/centos/5/updates/SRPMS/ or http://mirrors.centos.org/centos/5/os/SRPMS/.
Install the SRPM which will get you the full kernel source in /usr/src/redhat/SOURCES (along with all RedHat’s patches) and the spec file in /usr/src/redhat/SPECS. You need to edit the spec file, so make a backup copy of it first. Find the “buildid” definition line, uncomment it, remove the extra space after % and change it to something like
%define buildid .JKF1
The tools supplied with RHEL5 and CentOS 5 are not good enough to build the kernel-headers, due to a lack of support for “unifdef” in GNU make. So find the line that sets “with_headers” and change it to
%define with_headers 0
Just before the “%build” line, you need to add the patch for the Hypervisor code. 2 of the parts of the Microsoft-supplied patch do not apply successfully, due to differences in the source code where it doesn’t match what Microsoft think it is. So do a “rpmbuild -bp kernel-2.6.spec” to build a patched source tree in /usr/src/redhat/BUILD. Then cd into it and try to apply the patch in /opt/linux_ic/patch/. You will find 2 bits of it don’t apply correctly. Look at the .rej file for each failed patch and apply the changes by hand. Copy the 2 manually patched source files to somewhere convenient like /root. Before the “%build” line, add a chunk of shell script that does something like this: (I am assuming here that you know what you’re doing
cd /usr/src/redhat/BUILD/kernel-2.6.18
( patch -p0 < /opt/linux_ic/patch/x2c-x64-sles.patch ; /bin/true )
cp -f /root/head64-xen.c linux-2.6.18.x86_64/arch/x86_64/kernel/
cp -f /root/pgalloc.h linux-2.6.18.x86_64/include/asm-x86_64/mach-xen/asm/
You can now build the RPM, which will construct several kernels, including the xen one which is what you need. So
cd /usr/src/redhat/SPECS
rpmbuild -ba kernel-2.6.spec
Be warned, this will take *hours* on a on a virtual machine.
Now install the xen version of the new kernel:
cd /usr/src/redhat/RPMS/x86_64
rpm -ivh --force kernel-xen-2*.JKF2*rpm
Build the x2v version of the kernel
cd /opt/linux_ic
perl setup.pl x2v /boot/grub/grub.conf
Now you need to fix up the /boot/grub/grub.conf file. For the section that includes the x2v-64 stuff, remove the “/boot” leading path, as all paths must be given relative to /boot. You *do* need the leading “/” though. The final section you get should look like this:
title CentOS (2.6.18-53.1.4.el5.JKF2xen)
root (hd0,0)
kernel /x2v-64.gz
module /vmlinuz-2.6.18-53.1.4.el5.JKF2xen ro root=/dev/VolGroup00/LogVol00 rhgb quiet
module /initrd-2.6.18-53.1.4.el5.JKF2xen.img
I strongly advise you comment out the “hiddenmenu” setting, and set the default to this kernel (they are numbered from 0=start of file).
Now reboot, and it should boot your newly built kernel with the X2V shims in place.
Next step is to build the drivers. There is one problem that needs fixing first, the “build” link in the /lib/modules/ directory will be broken. To fix this, make it point into the kernel source that you have been building from, with something like this:
cd /lib/modules/`uname -r`
ln -nsf /usr/src/rdhat/BUILD/kernel-2.6.18/linux-2.6.18.x86_64 build
Now build the drivers:
cd /opt/linux_ic
perl setup.pl drivers
You should now have the drivers running, and should have just seen the output of the “modprobe vmbus” command. And you should find that “ifconfig” outputs a new network device “seth0”. When you reboot, the vmbus module willl automatically be started. Unfortunately, it loads too late in time for it to be used for the seth0 network interface to be the sole external network interface, nor in time for the SCSI device to mount filesystems stored on virtual SCSI disks. Moving the init.d script to S04vmbus doesn’t help, as kudzu does not see the device and so removes it from the /etc/sysconfig/network-scripts directory. UPDATE -- appears to work okay as a network interface, like on SuSE 10.
If you try to attach the network interface automatically at boot time, you will need to do this after the machine has booted:
service network start
service sshd restart
along with any other network-connected daemons you have started, such as MailScanner or sendmail.
You now have the same ICs running in CentOS 5.1 or RHEL 5 as Microsoft intended to run in SuSE 10.
This page tells you how to install the Windows Server 2008 virtualization Hyper-V Linux Integration Components in CentOS and RHEL (RedHat Enterprise Linux) 5. I did it all in x86_64 (or x64) as it is much more interesting and useful.
Installing the ICs in CentOS 5.1 or RHEL 5.1 is rather harder than in SuSE 10.
You need to copy the code off the CDROM ISO image, so let’s start by doing that:
mkdir -p /mnt/cdrom
mount /dev/cdrom /mnt/cdrom
mkdir /opt/linux_ic
( cd /mnt/cdrom && tar cf - . ) | ( cd /opt/linux_ic && tar xvBpf - )
umount /mnt/cdrom
Next, get the kernel source for the exact version of kernel and kernel-headers you are using. “rpm -qa | grep kernel” will tell you what kernel-headers you have. Remember that a “yum update” may change the kernel version.
Once you have the the kernel version, go and find the kernel source SRPM. You can get this from http://mirrors.centos.org/centos/5/updates/SRPMS/ or http://mirrors.centos.org/centos/5/os/SRPMS/.
Install the SRPM which will get you the full kernel source in /usr/src/redhat/SOURCES (along with all RedHat’s patches) and the spec file in /usr/src/redhat/SPECS. You need to edit the spec file, so make a backup copy of it first. Find the “buildid” definition line, uncomment it, remove the extra space after % and change it to something like
%define buildid .JKF1
The tools supplied with RHEL5 and CentOS 5 are not good enough to build the kernel-headers, due to a lack of support for “unifdef” in GNU make. So find the line that sets “with_headers” and change it to
%define with_headers 0
Just before the “%build” line, you need to add the patch for the Hypervisor code. 2 of the parts of the Microsoft-supplied patch do not apply successfully, due to differences in the source code where it doesn’t match what Microsoft think it is. So do a “rpmbuild -bp kernel-2.6.spec” to build a patched source tree in /usr/src/redhat/BUILD. Then cd into it and try to apply the patch in /opt/linux_ic/patch/. You will find 2 bits of it don’t apply correctly. Look at the .rej file for each failed patch and apply the changes by hand. Copy the 2 manually patched source files to somewhere convenient like /root. Before the “%build” line, add a chunk of shell script that does something like this: (I am assuming here that you know what you’re doing
cd /usr/src/redhat/BUILD/kernel-2.6.18
( patch -p0 < /opt/linux_ic/patch/x2c-x64-sles.patch ; /bin/true )
cp -f /root/head64-xen.c linux-2.6.18.x86_64/arch/x86_64/kernel/
cp -f /root/pgalloc.h linux-2.6.18.x86_64/include/asm-x86_64/mach-xen/asm/
You can now build the RPM, which will construct several kernels, including the xen one which is what you need. So
cd /usr/src/redhat/SPECS
rpmbuild -ba kernel-2.6.spec
Be warned, this will take *hours* on a on a virtual machine.
Now install the xen version of the new kernel:
cd /usr/src/redhat/RPMS/x86_64
rpm -ivh --force kernel-xen-2*.JKF2*rpm
Build the x2v version of the kernel
cd /opt/linux_ic
perl setup.pl x2v /boot/grub/grub.conf
Now you need to fix up the /boot/grub/grub.conf file. For the section that includes the x2v-64 stuff, remove the “/boot” leading path, as all paths must be given relative to /boot. You *do* need the leading “/” though. The final section you get should look like this:
title CentOS (2.6.18-53.1.4.el5.JKF2xen)
root (hd0,0)
kernel /x2v-64.gz
module /vmlinuz-2.6.18-53.1.4.el5.JKF2xen ro root=/dev/VolGroup00/LogVol00 rhgb quiet
module /initrd-2.6.18-53.1.4.el5.JKF2xen.img
I strongly advise you comment out the “hiddenmenu” setting, and set the default to this kernel (they are numbered from 0=start of file).
Now reboot, and it should boot your newly built kernel with the X2V shims in place.
Next step is to build the drivers. There is one problem that needs fixing first, the “build” link in the /lib/modules/
ln -nsf /usr/src/rdhat/BUILD/kernel-2.6.18/linux-2.6.18.x86_64 build
Now build the drivers:
cd /opt/linux_ic
perl setup.pl drivers
You should now have the drivers running, and should have just seen the output of the “modprobe vmbus” command. And you should find that “ifconfig” outputs a new network device “seth0”. When you reboot, the vmbus module willl automatically be started. Unfortunately, it loads too late in time for it to be used for the seth0 network interface to be the sole external network interface, nor in time for the SCSI device to mount filesystems stored on virtual SCSI disks. Moving the init.d script to S04vmbus doesn’t help, as kudzu does not see the device and so removes it from the /etc/sysconfig/network-scripts directory. UPDATE -- appears to work okay as a network interface, like on SuSE 10.
If you try to attach the network interface automatically at boot time, you will need to do this after the machine has booted:
service network start
service sshd restart
along with any other network-connected daemons you have started, such as MailScanner or sendmail.
You now have the same ICs running in CentOS 5.1 or RHEL 5 as Microsoft intended to run in SuSE 10.
Hyper-V Integration Components in SuSE 10
17/12/07 12:10 Filed in: Hyper-V
Make sure you install the Xen kernels in the installation process. Else install them separately, packages are kernel-xen or kernel-xen-pae.
Copy the whole of the LinuxIC.iso to /opt/linux_ic
cd /opt/linux_ic
perl setup.pl x2v /boot/grub/menu.lst
Reboot the VM.
perl setup.pl drivers
Once you’ve done that, “ifconfig” should list the “seth0” ethernet interface; “cat /proc/scsi/scsi” should list the hard disk device. Create a partition with fdisk and mkfs.ext3 /dev/sda1 to build a new partition.
There is also a HAL patch for the device manager in X, but you don’t need that.
If on an x86_64 system, you need to build a new kernel. Do all of this instead of the x2v line above.
Install the kernel_source package.
cd /usr/src/linux
cp /opt/linux_ic/patch/x2v-x64-sles.patch .
patch -l p1 < x2v-x64-sles.patch
cp /boot/config-....-xen .patch
make oldconfig
make vmlinuz
cp vmlinux /boot/vmliuz-...-xen
cd /opt/linux_ic
perl setup.pl x2v /boot/grub/menu.lst
Reboot the VM
perl setup.pl drivers
Windows Hyper-V Beta
14/12/07 12:09 Filed in: Hyper-V
Windows Server 2008 RC1 with Hyper-V Beta is publicly available here:
http://www.microsoft.com/downloads/details.aspx?FamilyId=8F22F69E-D1AF-49F0-8236-2B742B354919&displaylang=en
Beta Integration Components for Linux available through connect.microsoft.com:
https://connect.microsoft.com/site/sitehome.aspx?SiteID=495
is the home page for them.
The “Downloads” link on the left contains the links to where you get it all. Only support for SLES 10 at the moment. Expect RHEL5 support in a later beta.
Can’t get Windows Server Backup to see that my backup disk is on-line. I have told it that it is to use the disk as a backup drive. But still won’t recognise it. Now testing to see if a reboot will fix it.
No good. The drive now has a different GUID. “wbadmin restore catalog” command doesn’t work, always gives error about -backupTarget: setting missing, despite its being there. Bug.
Can’t file a bug report as there’s no icon on the desktop which is how we’re supposed to do it. You would have thought they might have seen this one!
I’ll ask JL about filing bug reports.
Windows PE
13/12/07 12:07 Filed in: Windows PE
Creating a bootable CD-ROM of WinPE is here: http://technet2.microsoft.com/WindowsVista/en/library/7a47a896-ca59-4586-b688-3a3c098d34241033.mspx?mfr=true
Adding things to the bootable CD-ROM image: http://www.svrops.com/svrops/articles/winvistape2.htm
Adding things to the bootable CD-ROM image: http://www.svrops.com/svrops/articles/winvistape2.htm
Windows Server 2008
13/12/07 12:03 Filed in: Windows Server 2008