Windows Server 2008
Hyper-V Linux Integration Components in x86_64 and x86 CentOS and RHEL
22/07/08 11:53
Update: 16th February 2010: Added “unifdef” to the list of required RPMs to build the kernel.
Update: 10th September 2008: This page has been updated for the final release version of the Linux Integration Components.
Update: 19th September 2008: This page has been updated for CentOS and RedHat x86_64 and x86 releases, so all 4 variations are covered.
Update: 2nd December 2008: Link to Hyper-V Tools updated to 1.0 finally.
Update: 22nd May 2009: This does not work with CentOS 5.3 or RedHat 5.3.
This page tells you how to install the Windows Server 2008 virtualization Hyper-V Linux Integration Components in CentOS and RHEL (RedHat Enterprise Linux) 5. I initially did it all in x86_64 (or x64) as it is much more interesting and useful. There are also notes below about setting it up on 32-bit systems where there are differences.
Installing the ICs in CentOS 5.2 or RHEL 5.2 is rather harder than in SuSE 10.
By the time you reach the end of this guide, you will be able to use the RedHat or CentOS “setup” program and /etc/sysconfig/network-scripts/ifcfg-eth0 and ifcfg-seth0 files to set your seth0 interface as the primary interface to use in the virtual machine.
You need to copy the code off the CDROM ISO image, so let’s start by doing that. Using the “Media” menu in the Hyper-V “Connect...” window, choose “DVD Drive”, “Insert Disk...” and select the Linux Integration Components ISO image, usually called “LinuxIC.iso”. Then
mkdir -p /mnt/cdrom
mount /dev/cdrom /mnt/cdrom
cp -rp /mnt/cdrom /opt/linux_ic
umount /mnt/cdrom
I strongly advise at this point that you make sure you have the latest patches and updates on your system, so do “yum update“.
Next, get the kernel source for the exact version of kernel you are using. “rpm -q kernel” will tell you what kernel you have. Remember that a “yum update” may change the kernel version. For this example HOWTO, “rpm -q kernel” produced “kernel-2.6.18-92.el5” so my kernel source RPM will be “kernel-2.6.18-92.el5.src.rpm”.
Once you have the the kernel version, go and find the kernel source SRPM.
RedHat: You can get this from ftp://ftp.redhat.com/pub/redhat/linux/enterprise/5Server/en/os/SRPMS/kernel-2.6.18-92.el5.src.rpm.
CentOS: You can get this from ftp://mirrorservice.org/sites/mirror.centos.org/5.2/updates/SRPMS/kernel-2.6.18-92.1.10.el5.src.rpm.
You will obviously have to get networking working using the legacy network adapter so that you can reach ftp.redhat.com to fetch this file.
yum install redhat-rpm-config gcc rpm-build make gnupg unifdef
If you are not sure, run that command anyway, it will not do any harm if you already have the packages installed.
Install the SRPM with the command
rpm -ivh kernel-*.src.rpm
which will get you the full kernel source in /usr/src/redhat/SOURCES (along with all RedHat’s patches) and the spec file in /usr/src/redhat/SPECS/kernel-2.6.spec. You need to edit the spec file, so make a backup copy of it first for safety.
Before the “%build” line, insert this line:
64-bit systems: patch -p1 -d ../linux-%{kversion}.%{_target_cpu} < /opt/linux_ic/patch/x2v-x64-rhel.patch
32-bit systems: patch -p1 -d ../linux-%{kversion}.%{_target_cpu} < /opt/linux_ic/patch/x2v-x32-rhel.patch
You also want to only build the “xen” version of the kernel. So find the line that defined “%define with_xen” and change it to
%define with_xen 1
and the line containing “%define with_xenonly”, if there is one, needs to be changed to
%define with_xenonly 1
You can now build the RPM, which will construct the xen one which is what you need. So
cd /usr/src/redhat/SPECS
64-bit systems: rpmbuild -ba kernel-2.6.spec
32-bit systems: rpmbuild -ba --target i686 kernel-2.6.spec
Be warned, this will take *hours* on a on a virtual machine.
If, shortly after that starts, you get an error about “Not enough random bytes available” then do this to make some more entropy:
1. Press Ctrl-Z
2. Run the command “du / ; grep -r hello /“
3. Let this run for 30 seconds or so, then press Ctrl-C
4. Run the command “fg”
5. If nothing happens immediately, go back to step 1, just above, and try again.
32-bit systems: cd /usr/src/redhat/RPMS/i686
rpm -ivh kernel-xen-2*rpm
rpm -Uvh kernel-xen-devel-2*rpm
If either of those “rpm” commands give any errors, add “--force” to the command and run it again.
Build the x2v version of the kernel
cd /opt/linux_ic
perl setup.pl x2v /boot/grub/grub.conf
Check the /boot/grub/grub.conf file, especially the “kernel” line, but no changes should be needed on simple RedHat 64-bit single-operating-system setups.
64-bit systems: The first section of the file should look like this:
title Red Hat Enterprise Linux Server (2.6.18-92.el5xen)
root (hd0,0)
kernel /x2v-64.gz
module /vmlinuz-2.6.18-92.el5xen ro root=/dev/VolGroup00/LogVol00 rhgb quiet
module /initrd-2.6.18-92.el5xen.img
32-bit systems: The first section of the file should look like this:
title Red Hat Enterprise Linux Server (2.6.18-92.el5xen)
root (hd0,0)
kernel /x2v-pae.gz
module /vmlinuz-2.6.18-92.el5xen ro root=/dev/VolGroup00/LogVol00 rhgb quiet
module /initrd-2.6.18-92.el5xen.img
Now double-check the “kernel” line, and make sure it says “pae” and not “32”.
Reboot, and it should boot your newly built kernel with the X2V shims in place.
To fix the “build” link, make it point into the kernel source that you have been building from, with something like this:
cd /lib/modules/`uname -r`
ln -nsf /usr/src/kernels/`uname -r`-`arch` build
Note: Please note that in the preceding commands, the quotes are single backquotes, not apostrophes or anything else.
RedHat systems:
cd /opt/linux_ic
perl setup.pl drivers
CentOS systems:
cd /opt/linux_ic
Edit setup.pl and look for the string “kernel-devel”. Change that to “kernel-xen-devel” and save the file.
perl setup.pl drivers
You should now have the drivers running. If you have added a network adapter (not a “Legacy Network Adapter&rdquo to your virtual machine, you should find that “ifconfig -a” outputs a new network device “seth0”. When you reboot, the vmbus module willl automatically be started, along with the other synthetic device drivers, such as the SCSI storage driver and the network driver.
Update: 10 Sept 2008: This step does not appear to be required
To build a new initrd image, so that all the correct drivers are detected every time your virtual machine boots, you need to do this (note this is one very long command, all on one line):
mkinitrd -f --preload vmbus --preload storvsc --preload netvsc --preload blkvsc --force-ide-probe --force-scsi-probe --force-lvm-probe /boot/initrd-2.6.18-92.el5xen.img 2.6.18-92.el5xen
Update: 10 Sept 2008: This section does not appear to be required
yum install xorg-x11-server-sdk xorg-x11-proto-devel
Note that for that “yum” command to work with RedHat Linux, you must be subscribed to their update service so that you can fetch the package, or else you will have to go and find them on your installation DVD/CDs.
Then
cd /opt/linux_ic
cd drivers/dist
make inputvsc_install
At this point, you might want to reboot to be sure that your new network devices are configured how you expected at boot time, and that any SCSI disks specified in /etc/fstab are mounted as you expected.
You now have the same ICs running in CentOS 5.2 or RHEL 5.2 as Microsoft intended to run in SuSE Linux.
Update: 10th September 2008: This page has been updated for the final release version of the Linux Integration Components.
Update: 19th September 2008: This page has been updated for CentOS and RedHat x86_64 and x86 releases, so all 4 variations are covered.
Update: 2nd December 2008: Link to Hyper-V Tools updated to 1.0 finally.
Update: 22nd May 2009: This does not work with CentOS 5.3 or RedHat 5.3.
This page tells you how to install the Windows Server 2008 virtualization Hyper-V Linux Integration Components in CentOS and RHEL (RedHat Enterprise Linux) 5. I initially did it all in x86_64 (or x64) as it is much more interesting and useful. There are also notes below about setting it up on 32-bit systems where there are differences.
Installing the ICs in CentOS 5.2 or RHEL 5.2 is rather harder than in SuSE 10.
Configuring the Virtual Machine
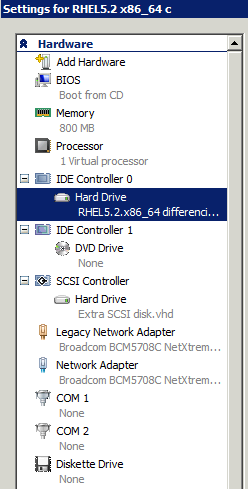
Using the Hyper-V Manager, edit the settings of your new RHEL or CentOS virtual machine, and add a Network Adapter (in addition to the Legacy Network Adapter you already have) and a SCSI Controller with a Hard Drive attached to it. Ensure the Network Adapter is assigned to the virtual network that contains your physical external network card. The hardware settings window should look similar to this:By the time you reach the end of this guide, you will be able to use the RedHat or CentOS “setup” program and /etc/sysconfig/network-scripts/ifcfg-eth0 and ifcfg-seth0 files to set your seth0 interface as the primary interface to use in the virtual machine.
Fetching the Tools
You first need to fetch a copy of the ISO image from the zip of the Linux Integration Components.You need to copy the code off the CDROM ISO image, so let’s start by doing that. Using the “Media” menu in the Hyper-V “Connect...” window, choose “DVD Drive”, “Insert Disk...” and select the Linux Integration Components ISO image, usually called “LinuxIC.iso”. Then
mkdir -p /mnt/cdrom
mount /dev/cdrom /mnt/cdrom
cp -rp /mnt/cdrom /opt/linux_ic
umount /mnt/cdrom
I strongly advise at this point that you make sure you have the latest patches and updates on your system, so do “yum update“.
Next, get the kernel source for the exact version of kernel you are using. “rpm -q kernel” will tell you what kernel you have. Remember that a “yum update” may change the kernel version. For this example HOWTO, “rpm -q kernel” produced “kernel-2.6.18-92.el5” so my kernel source RPM will be “kernel-2.6.18-92.el5.src.rpm”.
Once you have the the kernel version, go and find the kernel source SRPM.
RedHat: You can get this from ftp://ftp.redhat.com/pub/redhat/linux/enterprise/5Server/en/os/SRPMS/kernel-2.6.18-92.el5.src.rpm.
CentOS: You can get this from ftp://mirrorservice.org/sites/mirror.centos.org/5.2/updates/SRPMS/kernel-2.6.18-92.1.10.el5.src.rpm.
You will obviously have to get networking working using the legacy network adapter so that you can reach ftp.redhat.com to fetch this file.
Building the Kernel
In order to install and build the kernel, there are a few packages you need to ensure you have installed. If you installed everything, then don’t worry. If you didn’t, then you will find you will need to do this, which should install all the packages you actually need:yum install redhat-rpm-config gcc rpm-build make gnupg unifdef
If you are not sure, run that command anyway, it will not do any harm if you already have the packages installed.
Install the SRPM with the command
rpm -ivh kernel-*.src.rpm
which will get you the full kernel source in /usr/src/redhat/SOURCES (along with all RedHat’s patches) and the spec file in /usr/src/redhat/SPECS/kernel-2.6.spec. You need to edit the spec file, so make a backup copy of it first for safety.
Before the “%build” line, insert this line:
64-bit systems: patch -p1 -d ../linux-%{kversion}.%{_target_cpu} < /opt/linux_ic/patch/x2v-x64-rhel.patch
32-bit systems: patch -p1 -d ../linux-%{kversion}.%{_target_cpu} < /opt/linux_ic/patch/x2v-x32-rhel.patch
You also want to only build the “xen” version of the kernel. So find the line that defined “%define with_xen” and change it to
%define with_xen 1
and the line containing “%define with_xenonly”, if there is one, needs to be changed to
%define with_xenonly 1
You can now build the RPM, which will construct the xen one which is what you need. So
cd /usr/src/redhat/SPECS
64-bit systems: rpmbuild -ba kernel-2.6.spec
32-bit systems: rpmbuild -ba --target i686 kernel-2.6.spec
Be warned, this will take *hours* on a on a virtual machine.
If, shortly after that starts, you get an error about “Not enough random bytes available” then do this to make some more entropy:
1. Press Ctrl-Z
2. Run the command “du / ; grep -r hello /“
3. Let this run for 30 seconds or so, then press Ctrl-C
4. Run the command “fg”
5. If nothing happens immediately, go back to step 1, just above, and try again.
Installing the Kernel
64-bit systems: cd /usr/src/redhat/RPMS/x86_6432-bit systems: cd /usr/src/redhat/RPMS/i686
rpm -ivh kernel-xen-2*rpm
rpm -Uvh kernel-xen-devel-2*rpm
If either of those “rpm” commands give any errors, add “--force” to the command and run it again.
Build the x2v version of the kernel
cd /opt/linux_ic
perl setup.pl x2v /boot/grub/grub.conf
Check the /boot/grub/grub.conf file, especially the “kernel” line, but no changes should be needed on simple RedHat 64-bit single-operating-system setups.
64-bit systems: The first section of the file should look like this:
title Red Hat Enterprise Linux Server (2.6.18-92.el5xen)
root (hd0,0)
kernel /x2v-64.gz
module /vmlinuz-2.6.18-92.el5xen ro root=/dev/VolGroup00/LogVol00 rhgb quiet
module /initrd-2.6.18-92.el5xen.img
32-bit systems: The first section of the file should look like this:
title Red Hat Enterprise Linux Server (2.6.18-92.el5xen)
root (hd0,0)
kernel /x2v-pae.gz
module /vmlinuz-2.6.18-92.el5xen ro root=/dev/VolGroup00/LogVol00 rhgb quiet
module /initrd-2.6.18-92.el5xen.img
Now double-check the “kernel” line, and make sure it says “pae” and not “32”.
Reboot, and it should boot your newly built kernel with the X2V shims in place.
Building the Hypervisor, Network and Storage Drivers
The next step is to build the drivers. There are a problem that needs fixing first, the “build” link in the /lib/modules/ directory will be broken, and you need a module build environment.To fix the “build” link, make it point into the kernel source that you have been building from, with something like this:
cd /lib/modules/`uname -r`
ln -nsf /usr/src/kernels/`uname -r`-`arch` build
Note: Please note that in the preceding commands, the quotes are single backquotes, not apostrophes or anything else.
Build the Drivers
RedHat systems:
cd /opt/linux_ic
perl setup.pl drivers
CentOS systems:
cd /opt/linux_ic
Edit setup.pl and look for the string “kernel-devel”. Change that to “kernel-xen-devel” and save the file.
perl setup.pl drivers
You should now have the drivers running. If you have added a network adapter (not a “Legacy Network Adapter&rdquo
Update: 10 Sept 2008: This step does not appear to be required
To build a new initrd image, so that all the correct drivers are detected every time your virtual machine boots, you need to do this (note this is one very long command, all on one line):
mkinitrd -f --preload vmbus --preload storvsc --preload netvsc --preload blkvsc --force-ide-probe --force-scsi-probe --force-lvm-probe /boot/initrd-2.6.18-92.el5xen.img 2.6.18-92.el5xen
Update: 10 Sept 2008: This section does not appear to be required
Building the X Mouse Driver
The last step is to build the mouse driver for use by X. This is very simple, you just need to install a couple of extra packages withyum install xorg-x11-server-sdk xorg-x11-proto-devel
Note that for that “yum” command to work with RedHat Linux, you must be subscribed to their update service so that you can fetch the package, or else you will have to go and find them on your installation DVD/CDs.
Then
cd /opt/linux_ic
cd drivers/dist
make inputvsc_install
That’s it!
You can now use the “setup” command to configure the networking and then edit the /etc/sysconfig/network-scripts/ifcfg-*eth* files to configure the new “seth0” interface to start on boot, and configure the old legacy “eth0” interface to not start on boot (set “ONBOOT=no” in /etc/sysconfig/network-scripts/ifcfg-eth0).At this point, you might want to reboot to be sure that your new network devices are configured how you expected at boot time, and that any SCSI disks specified in /etc/fstab are mounted as you expected.
You now have the same ICs running in CentOS 5.2 or RHEL 5.2 as Microsoft intended to run in SuSE Linux.
Comments
Activating Windows Server 2008
11/03/08 12:19
Microsoft Windows [Version 6.0.6001]
Copyright (c) 2006 Microsoft Corporation. All rights reserved.
C:\Users\Administrator>cscript \windows\system32\slmgr.vbs /ipk VPWVT-.....-.....-.....-.....
Microsoft (R) Windows Script Host Version 5.7
Copyright (C) Microsoft Corporation. All rights reserved.
Installed product key VPWVT-....-.....-.....-..... successfully.
C:\Users\Administrator>cscript \windows\system32\slmgr.vbs /ato
Microsoft (R) Windows Script Host Version 5.7
Copyright (C) Microsoft Corporation. All rights reserved.
Activating Windows Server(R), ServerEnterprise edition (bb1d27c4-959d-4f82-b0fd-c02a7be54732) ...
Product activated successfully.
C:\Users\Administrator>
As easy as that
Windows Server 2008
13/12/07 12:03